Learning about Coast Salish art
- Feb 24
- 4 min read
By Lynda Sutherland (she/her), teacher, Vancouver
For the past several years, I have taught a cross-curricular Coast Salish art unit with my Grades 3–4 classes, and this year I adapted it for a Grades 2–3 class. Without fail, it becomes a favourite for students and for me. Each time I teach it, I’m struck by how deeply engaged students are. Even my most energetic learners sit calmly at their desks, focused and immersed in their artwork. The unit offers a meaningful way for students to learn more about the beautiful land we are grateful to live on.
Throughout the unit, students are given multiple opportunities to explore Coast Salish shapes, learn about animals, make cultural connections, and practise their skills through guided drawing, storytelling, and independent art activities. The scaffolded approach allows every learner to feel successful, while adaptations, such as providing preprinted animal shapes, ensure accessibility and success for every student. There are many opportunities to extend these lessons and connect them to other units you may be teaching.
One of the most rewarding parts of this unit is seeing students begin to notice Coast Salish art in their everyday lives. We are lucky to have such incredible Coast Salish art all around Vancouver and its surrounding areas. Many students come to school excited to share the trigons, crescents, ovals, and circles they spotted while out with family or friends, on buildings, ferries, murals, and public art.
Students’ final artworks are always stunning but, more importantly, students leave the unit with a deeper appreciation for Coast Salish art, Indigenous perspectives, and a stronger sense of connection to the land and community where they live.
Please see below for instructions on how to teach this meaningful and multistep art project with your students.

Step 1: Beginning with shape and symmetry
We begin the unit by exploring shape. What shapes do students already know? How do we recognize them? We discuss symmetry and look for examples in the world around us. I then introduce examples of Indigenous art through a PowerPoint of local art pieces and often by pointing out artwork in our school or community. Together, we examine the art for familiar shapes and for new ones. Students quickly notice that there are often shapes within shapes, sparking rich discussion and curiosity.
Step 2: Focused shape practice and creative exploration
During our next lesson, we focus specifically on Coast Salish shapes: trigons, circles, ovals, and crescents. Students practise drawing these shapes in different sizes, learning how they flow and connect. Once they feel comfortable, I give them a circle on paper and invite them to create their own design using only Coast Salish shapes. This activity builds confidence while reinforcing foundational skills.
Step 3: Story and media connections
In our next lesson, we review the shapes and read a story such as Goodnight World or Good Morning World by Paul Windsor (published by Native Northwest). As we read, students search for Coast Salish shapes in the illustrations: the moons, suns, trees, animals, and landscapes are filled with beautiful details of Coast Salish shapes. We also watch short videos, including one about the new BC Ferries artwork designed by Salish and Kwakwaka’wakw artist Maynard Johnny Jr. The Native Northwest YouTube page has been an excellent resource for learning about local artists and their work. Depending on the area your school is in, this can make a great opportunity to take learning outside of the classroom and go for a community walk. Look for Coast Salish shapes and art, and build connections to the land you are on.
Step 4: Exploring Coast Salish animals
During lesson four, we use Animals of the Salish Sea flash cards (also available for sale at Native Northwest) that feature designs by Indigenous artists. We explore the animals and discuss their meanings within Coast Salish culture. Each student receives a piece of paper folded into quadrants and chooses animals to copy. After practising drawing in pencil, students share their artwork and learning with a partner.
Step 5: The final multistep art project
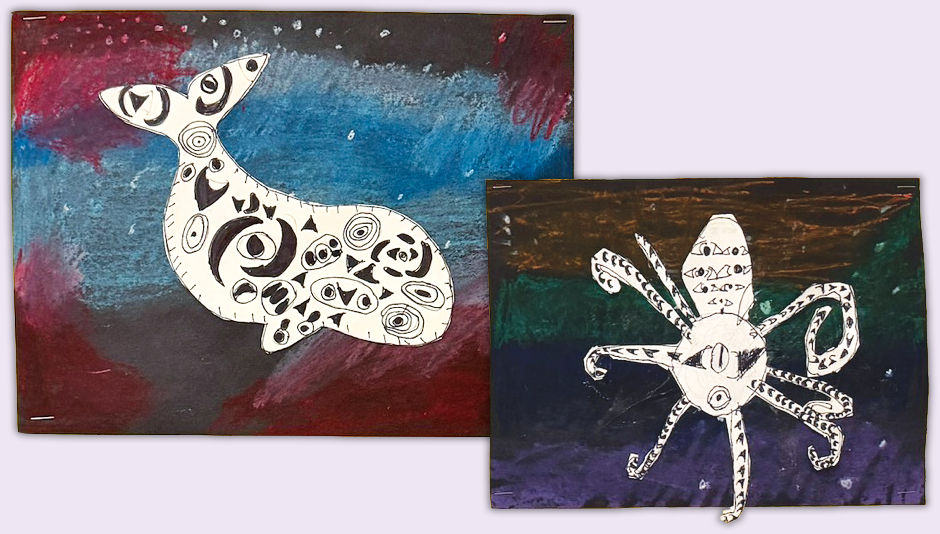
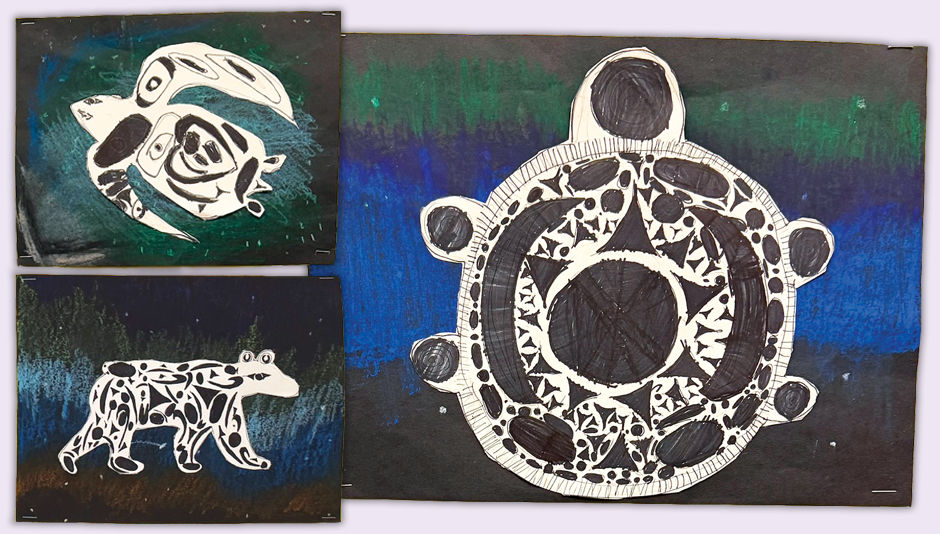
In the culminating lessons, students choose an animal, local or from elsewhere (this can be a great way to connect to other subjects, like science), and draw the overall shape on cardstock, using images from books or online as references. They are encouraged to use most of the page and fill their animal with Coast Salish shapes, thoughtfully transforming those shapes into eyes, facial features, and body details.
This part of the project takes two to three class periods and always surprises me with how calm and focused students are as they work on their art. When students finish their detailed pencil work, they use fine liners to outline their designs, then cut them out.
Step 6: Creating the background
For the final lesson, we create a backdrop inspired by the northern lights. After a short mini-lesson, students use oil pastels on black construction paper. They follow my guided instruction to add smudged colours throughout their paper. Once blended and smudged, we use white pastel to add some stars, then they glue their cut-out animals onto the backdrop. This backdrop adds a striking contrast to the black and white shapes that fill their animal art.